My favourite soups for fall: pumpkin or sweet potatoe?

I’m a big fan of autumn soups, and here you have 2 of my favourites, and both start with the same ingredients:

pumpkin and carrot creamy soup

For the Pumpkin and Carrots creamy soup:

  • 1 onion
  • 2 leeks
  • 3 or 4 carrots
  • 1 potatoe
  • 1 medium pumpkin
  • olive oil
  • 2 L of water
  • pinch of salt
  • pinch of black pepper

Start chopping everything, you don’t have to make tiny slices, because this soup is going to be slowly and patiently cooked! So no need for small pieces. Add the onion and the leeks to the pan, and cover with olive oil, to a medium-high heat.

pumpkin and carrot creamy soup

When you see they’re becoming a bit transparent, add the ingredients left and the water, and let it cook in a low-medium heat. Keep removing every now and then, and add a touch of salt and black pepper.

pumpkin and carrot creamy soup

It’s a really nice soup to serve warm in this weather, I absolutely love it! Let it boil until you see that the ingredients are really tender, that you can even tear them with the wooden spoon. Then, remove from the heat and start blending! You’ll have an amazing creamy soup ready to serve! I like to serve it with a bit of cheese puff pastry with sesame, it gives it an unique touch.

For the Pumpkin and Carrots creamy soup:  1 onion 2 leeks 3 or 4 carrots 1 potatoe 1 medium pumpkin olive oil 2 L of water pinch of salt pinch of black pepper

For the Sweet Potatoe creamy soup:

  • 1 onion
  • 2 leeks
  • 3 or 4 carrots
  • 3 sweet potatoes
  • olive oil
  • 2 L of water
  • pinch of salt
  • pinch of black pepper
  • pinch of cinnamon

The process is exactly the same, just changing the pumpkin for the sweet potatoes! You can cook it like this, or add a bit of cream if you want a thicker texture. Absolutely delicious!

sweet potatoe soup

Homemade Sushi

So my friends Eric and Dayana come home loaded with bags of goodies, what might they be carrying in there? Oh, you know, just the usual to create the most exquisite Sushi, at home!!

homemade sushi

It takes quite some time to make makis (if you count the time spent boiling the rice, etc) so count you’ll be around 2 hours to do it all (and I assure you it’s quite fun!)

These are the ingredients we’ll need (serves 5 people):

  • 400 gr of of rice
  • 400 ml water
  • 1 carrot
  • 1 cucumber
  • 1 avocado
  • 1 salmon
  • 1 pack of krissia (surimi)
  • 10 prawns
  • a pack of sushi seaweed
  • sesame
  • philadelphia
  • 80 ml of sushi vinegar
  • 30 gr of sugar
  • 15 gr of salt
  • wasabi
  • soy sauce
  • bamboo mats (one for each person)

The first step is to wash the rice. You have to wash it up to 7 or 10 times, and the last time you wash it, let it rest for 20 min.

homemade sushi

While the rice is cooling, you can start chopping the ingredients! Pick the salmon and cut it in cubes, and the carrot and cucumber in fine slices. Also chop the krissia, prawns and avocado.

homemade sushi

homemade sushi

Nock pick the rice and boil it, and pick the same amount of water and rice (400 gr rice = 400 ml water). Set to boil at high temperature for 2 min and cover with foil until it boils. Then reduce the heat to the minimum for about 10 minutes (still covered with the foil). Then, pour the rice into a big bowl, and add the mixture of sushi vinegar, sugar and salt, and once it’s mixed, set aside.

Now it’s time to pick your bamboo mats and a seaweed. The seaweed should be situaded at the bottom of the bamboo mat:

homemade sushi

Now, wash your hands, and with your hands still wet, pick a handfull of rice, and put it on the rugous side of the seaweed like this:

homemade sushi

I’ve written down where you should place all the ingredients. You have to leave a line at the top to add a bit of wasabi, and place the rice in a square, covering all sides. Don’t add too much rice, or the californian roll will be too big! After adding a bit of philadelphia at the bottom, let’s start adding all the ingredients left, bear in mind that you can make sushi with anything you want, even fruit, or mediterranean food such as chicken, mayonasse, etc. It’s your choice!

homemade sushi

So now that you have all the ingredients there, and the sesame, it’s time to roll! The real trick here is to push and tighten the roll each time. I think it will be better if you see how it’s done, so here you have all these pictures, step by step:

homemade sushi

homemade sushi

homemade sushi

homemade sushi

homemade sushi

homemade sushi

homemade sushi

homemade sushi

Now, pick a sharp knife, wash it, and while its wet, start cutting, without pressing the roll, paciently and smoothly. For each roll you should have 8 makis:

homemade sushi

homemade sushi

homemade sushi

Now you just have to serve them, with a bit of soy sauce or wasabi if you feel like it. They were absolutely delicious and I thankyou my friends for teaching me this!

homemade sushi

homemade sushi

Enjoy your makis!

Carquinyolis: you won’t be able to stop eating them!

Where does the word “biscotti” come from? How can you cook our little “Carquinyolis” to make them so crunchy and lean cut? Let’s find out!

Carquinyolis

Once you know how a carquinyoli is cooked, it all seems so easy! But how do you create this little bites of sweet biscotti? Let’s go to Italy to find out…

carquinyolis

The word “biscotti” means “twice cooked” in italian. Although I really thought carquinyolis were a catalan recipe, appearently italians loved this sweet goody too! But here in Catalonia, we add a twist to the traditional italian biscotti: we add whole almonds, and it makes all the diference!

Ingredients:

  • 1 egg (at room temperature)
  • 100 grs of raw natural almonds with their peel
  • 150-175 grs of flour
  • 100 grs granulated white sugar
  • 1 lemon’s zest and/or a pinch of cinnamon
  • 1 teaspoon of baking powder
  • 1 egg to brush
  • Water, or enough anise (the liquor), or red vermouth, and a pinch of salt to cover your almonds

carquinyolis

The carquinyoli is just one of those things that you start having one little piece of it…. and you end up eating the whole package! Because they are so little, so innocent, so delicious, that you can’t have just one!

Preparation:

  • Preheat oven at 180ºC.
  • Place the almonds inside a bowl and cover with the water or liquor of your taste.
  • Let them soak while you prepare the dough.
  • In a big bowl whip the egg, sugar and zest until you get a smooth and nearly white texture.
  • In a different bowl, mix the flour and the baking powder, and add to the egg mix.
  • Combine well with a spatula and/or using your hands until you have a consistent dough.
  • Add the almonds (not the liquid) to the dough and work a bit more with your hands until there is no flour powder left.
  • If the dough is too sticky, wet your hands with water and make a log/s with the dough.
  • Beat second egg and brush the logs!

carquinyolis dough

As we said, the catalan version of the biscotti involves whole almonds, cinnamon, and the dough is quite hard when you try to mix it, but it is definitely worth it!

carquinyolis

And the key to its texture? to bake it twice! So put your dough in the oven, and put it out when you see it’s starting to golden… Then it’s time to cut the dough into the little carquinyolis, and then put them in the oven againg until they reach this nice and golden colour.

carquinyolis

Cheese and Spinach cake – veggie flans

So imagine you have to prep a menu for your veggie guests, and you want to be a bit original. I was feeling inspired and decided to go for these delicious cheese and spinach “flans”, or cake, depending on how you decide to bake it.

cheese and spinach cake

It’s a quick dish to prepare (aprox. 40 min, baking included) and easy to make, here are the ingredients you’ll need!

For 6 flans (or one big cake):

  • 10 sun dried tomatoes
  • 250 gr of spinach leaves
  • 500 gr of fresh ricotta cheese
  • 3 eggs
  • 2 spoons of capers
  • A touch of nutmeg
  • black olives
  • salt
  • basil
  • black pepper
  • 6 molds / 1 big cake mold (smeared in butter)

And now, time to cook!

Pre-heat your oven at 190º.

Put one tomatoe in each mold, and cut the rest in fine slices.

To prepare your spinachs, cut the spinach pits and wash the leaves. Put them on a pan while they’re wet, and cook them until the leaves are soft. Put them under cold water and drain them.

cheese and spinach cake

Now, pick a bowl and pour the ricotta cheese. Start whisking, and then add the 3 eggs. Without stopping to whisk, pour the spinachs, the sliced tomatoes, the black olives (chopped), the basil and the cappers. Add a touch of nutmeg, salt and black pepper to the mix.

cheese and spinach cake

cheese and spinach cake

Pour the mix into the molds and put them in the oven, for about 20 minutes, or until you see the mix has hardened a bit and gone a bit larger.

cheese and spinach cake

cheese and spinach cake

Pick the molds and turn them arround, and let them cool down until they reach an ambient temperature.

cheese and spinach cake

You can serve them alone with some capers and olive oil, in my case I prefered to bake it as a big cake, and serve it sliced with some vegetable and algae quinoa. It’s a great option for a veggie menu! Today we’ll be having a pumpkin and carrots creamy soup for starters, the cheese and spinach cake as a main course, and some as desert fruits with a chocolate fondue… Bon Appétit!

Oatmeal Cookies beat Chocolate Chip ones!

There are some recipes that you just know you are going to love. As a cookie fan, I though chocolate chip cookies were unrivaled, until I tasted these delicious…

Spiced Oatmeal Cookies with dried Cranberries and Apricots

spiced oatmeal cookies with dried cranberries and apricots

Thanks to my collaboration with Cooking Languages and Tweed Idiomes, I was able to attend once again to an amazing Cookery Class in english, here in Terrassa. And when they told me we were preparing desserts… OMG, let me in!!

These cookies are just so sweet (withouth that much sugar), healthy, energising, and spiced, that I still have in my mind the smell they spread from the oven.

And it’s the combination of dried cranberries and apricots that do the trick: you would not think that you would end up loving them over chocolate!

dried cranberries

The preparation is quite easy: pick two bowls (so you can separate the moist ingredients from the dried ones) and start mixing up all the ingredients, you’ll be amazed at how quick and not-messy this recipe is!

oatmeal

The one thing I absolutely love about this recipe is the amount of spices used: cinnamon, ground cloves, and ginger powder. The cinnamon we used at class was so particulary aromatic and scented, it really made a big difference at the end.

spiced oatmeal cookies with dried fruits

Anything left? A little trick! If you have just taken these cookies out of the oven, and they are too warm to take home… don’t panick! At class we were able to bring them home safe and sound: if you don’t have a cooling rack, create some ventilation between the cookies and the table, so they can breathe a little, and then put them in a jar, or a cristal or metal container. It will make all the difference compared to the typical plastic tupperware!

Now there’s only one thing left: On the morning, wake up, get dressed, pick some of these energising cookies to work, and have them for breakfast, or at your minibreak from the office. You will feel rejuvenated!

For more dishes and recipes, please visit Cooking Languages site!

Los Vivancos – Extreme Flamenco Fusion – WHAT A SHOW!

It had been so long since a show had left me clapping till my hands hurt!

los vivancos barcelona Yesterday, by chance, we got to go to the theatre in the Teatre Tivoli in Barcelona. My mother in law told me we were going to watch “a musical”, but didn’t tell me any more details. And I am going to do the same with you!

Los Vivancos, a group of male dancers, left the whole theatre standing up and clapping through the whole show, I had never seen anything like that!!

They combined flamenco with acrobatics, and I just don’t have words to describe how amazingly astonishing this show is. I was literally open-mouthed the whole show as I saw what these boys can do while they tap their heels. I am not going to post any video, because you just have to GO and see it for yourselves! I think they’re on tour now and they will be in Barcelona until June 7th. These boys demonstrate that there are actually extraordinary people among us, and they do know how to make a show.

Tap tap tap!

The perfect twist for your Muffins? Try Savoury Muffins!

Savoury Muffins

Asparagus, sundried tomato & olive loaf

Savoury Muffins

Ingredients – Makes 12 muffins or 1 loaf

  • 100ml olive oil, plus extra for greasing
  • 250g asparagus spears, each cut into smallish pieces
  • 200g all purpose or whole wheat flour
  • 2 tsp baking powder
  • ½ tsp salt
  • 1 tbsp thyme leaves
  • 3 large eggs, lightly beaten
  • 100ml milk
  • Handful pitted black olives
  • 100g sundried tomatoes, roughly chopped
  • 100g Gruyère, grated

Preparation

  1. Pre-heat oven to 190C/fan 170C. Oil and line the base of a loaf tin (approx 22 x 10 x 5cm) with baking paper.
  2. Cook the asparagus in boiling, salted water for 2 minutes, drain, and cool quickly under cold running water. Dry with kitchen paper.

 IMG_9486

  1. Mix the flour, baking powder, salt and thyme in a large bowl. Make a well in the centre, and then add the eggs, milk and oil, stirring all the time to draw the flour into the centre. Beat for 1 min to make a smooth batter.

savoury muffins

  1. Reserve some asparagus tips and a few olives. Add the remaining asparagus, tomatoes, olives and two-thirds of the cheese to the batter. (I just really love these tomatoes!!)

sun dried tomatoes

  1. Pour into the tin and put the reserved asparagus and olives on top.

savoury muffins

  1. Bake until the cake/muffins feel firm to the touch and is golden and crusty on top. The thing with the knife is actually the best way to know if your muffins are ready: pich your muffin with the end of the knife, and if it’s dry when you put it out, then they’re ready! Now sprinkle with the remaining cheese and bake for another 5 minutes. Cool in the tin for 5 minutes, then turn out and cool on a wire rack.

asparagus muffins

They look amazing and I have to say I would have never guessed that a savoury muffin could actually taste that good! This recipe has just opened a whole new chapter in my baking strategies! 🙂

Take care! ^^

Moroccan Meatball and Egg Tagine and The hundred foot journey

Have you seen the movie The hundred foot journey? I love movies that involve cooking, restaurants, different cultures, love… And this movie was the perfect mixture of all of that! And watching this movie actually came to cooking a quite new and exciting recipe for me: Moroccan Meatball and egg Tagine. But first, the movie!!

Starring Helen Mirrel, Manish Dayal, Charlotte Le Bon and Om Puri, this movie tells the story about an indian family that goes to Europe to establish an Indian Restaurant. Hassan, the cook, is not very keen on the idea of staying in France, but by a fortunate accident they meet the beautiful Marguerite, and she brings them to this awfully cute little town, with typical food markets, and the most smart Restaurant in miles, Michelin-starred. And guess which place does Papa choose to establish their indian restaurant? a 100 foot in front of them.

margherite charlotte le bon

It’s just one of those films where you feel like you can even smell the ingredients, you know? the food, the spices… and you just want to watch the movie and go cook! So there I was, fascinated by all the spices Hassan uses, and I decided to cook something especial: not indian, not french, but Moroccan: Meatballs and egg Tagine!

The key to this dish is the broad arrange of spices that you’ll use. Here you have the ingredients:

spices tagine meatballs egg

For the Tomato Sauce:

  • 2 tablespoons of olive oil
  • 2 cloves of garlic, finely chopped
  • 1 teaspoon of sweet paprika
  • 1/2 teaspoon of ground cumin
  • A pinch of ground turmeric
  • 1/2 teaspoon of salt
  • A pinch of black pepper
  • A pinch of cayenne
  • 750 g of whole canned tomatoes in their juice
  • 1/4 teaspoon saffron threads
  • 1/4 cup finely chopped fresh parsley
  • 1/4 cup finely chopped fresh cilantro

Meatballs, and 2 eggs.

Let’s start adding the spices:

spices tagine meatballs egg

panTake a saucepan and heat the olive oil. Moroccans actually use a certain pan to cook this dish, it is called a Tagine Pan, and it sort of looks like this pan on the right. Very crafted, usually decorated, and perfect to cook this dish. Of course I couldn’t find something like this on time, so I used a normal frying pan, and the result was also fine! Let’s continue with the sauce by adding the garlic (finelly chopped) and let it hang in there with the hot oil for a few tagine panminutes. Add the spices, and mix well! It’s very nice to smell each spice before adding it to the pan, this dish smells amazing! Wait a few minutes, and then add the tomatoes. At a low heat, wait for 15 minutes, with the pan covered.

Now it’s time to add the meatballs. At a low heat, let it boil there for 30 minutes.

Finally, add the 2 eggs into the sauce, and let it boil until the whites are set.

The result is really tasty, a lot of flavours and a smell that takes you to a moroccan market in Marrakech. When cooking a dish from a foreign country or culture, I always try to look for a typical song or music style and have it as backround while cooking. I tried some Chill Out – Lounge Moroccan music, and felt like I was there!

tagine meatballs egg

Yummy right?

Take care! 🙂

Dinning at La Fragata, Sitges

la fragata sitges

I just wanted to share a few pictures of what we ate this weekend at the Restaurant La Fragata, in Sitges. We went there with a couple of friends so we could taste different dishes 🙂 I’m a big fan of the Steak Tartar and the Foie Micuit (those were my choices 😉 ) and my friends ordered Escalivada, a Tuna and Avocado Tartar (I have the recipe for that, I made one at home and was deliiiicious, but I didn’t take any pictures… I will the next time!), and a really nice Steak. I have to say everything was mouthwatering, we accompanied everything with a nice wine (Emilio Moro, 2012) and left with very happy tummies 🙂

mi cuit foie coca escalivada steak tartar tuna avocado tartar steak IMG_9431 IMG_9433 IMG_9434

I bet you feel like having dinner right now! 😉

Stuffed Cypriot Chicken & Tzatziki!!

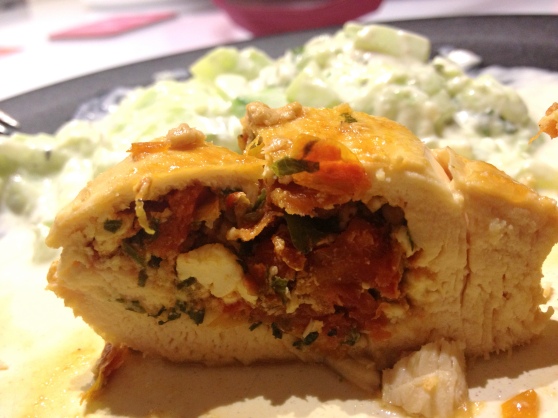
I’ve just arrived home and I have this mouthwatering dish in front of me: Some really amazing looking Cypriot Chicken and some Tzatziki, all for me! 🙂

I’ve gotta say I had the most wonderful evening: an english cooking class? Could there be anything more perfect than that?

Stuffed cypriot chicken

First I’ll let you have both recipes, and then we’ll see how to cook these cool dishes!

For the Stuffed Cypriot Chicken, we’ll need (for 4 people):

  • 4 chicken breasts, slit lengthwise
  • 100 gr feta cheese
  • 2 cloves of garlic
  • 8 sun-dried tomatoes
  • zest of one lemon
  • small bunch of parsley
  • small bunch of basil
  • 2 springs of fresh rosemary
  • olive oil (for the grilling)

And for the Tzatziki:

  • 250 gr of Greek yoghurt
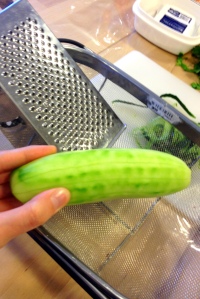
  • 1 cucumber
  • 2 tbsp lemon juice
  • 2 cloves of garlic
  • a few mint leaves
  • extra virgin olive oil
  • paprika
  • black pepper

Have you got everything? Then put your apron on and let’s start cooking!

We’ll start by chopping the cucumber from the Tzatziki (we want to take the water out of it, so we’ll have to peel the cucumber, de-seed it, and grate it, and then add some salt and put in on a strainer!! (To squeeze out all the excessive liquid)

IMG_9329

IMG_9336
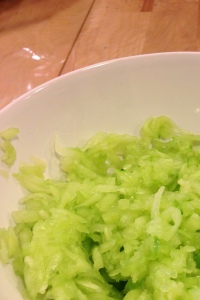
So in the end we’ll have something like this! Now that we have our cucumber left there hanging, it’s time for us to start on our delicious stuffed chicken 🙂

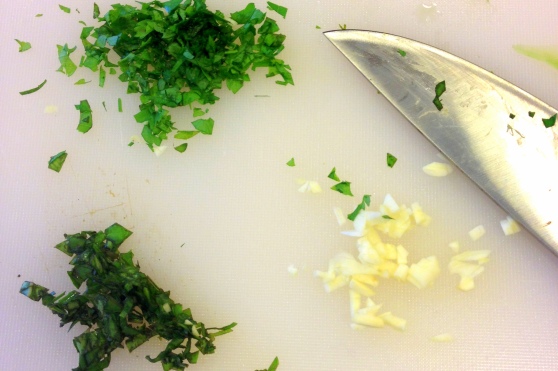
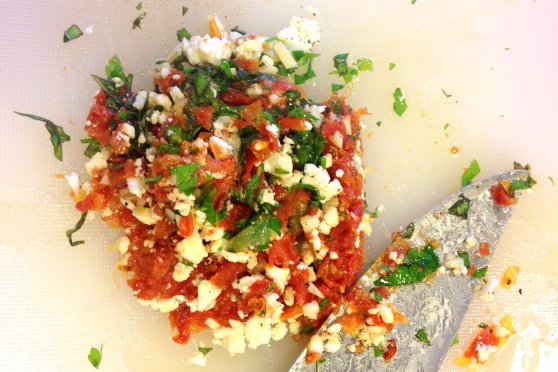
Chopping time! Pick your parsley, basil, rosemary, sun-dried tomatoes and garlic on your board and start chopping untill everything gets tiny!

chopping vegetables

And now you can add the cheese, and a touch of black peppers, and start mixing it all up!

inside of stuffed cypriot chicken

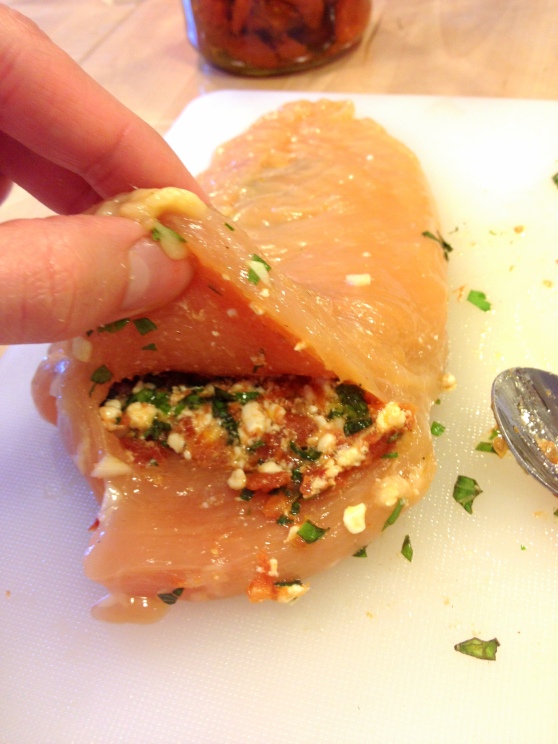
Now’s time for us to put this heavenly smelling mixture into the chicken. Note that the chicken has a quite specific cut, slit lengthwise. This is really important, as if it was actually splitted in half, the mixture would end up all over the frying pan!

stuffed chicken

Now everything gets quite easier: heat oil in the frying pan, and add the breasts there, until they are a bit brown. Then it’ll be time to cover it up with oven paper (little trick I learned in this class: water the oven paper before putting it on the frying pan!). Now you can leave it there cooking, shaking the pan every now and then, untill it’s golden. Turn the chicken over to cook the other side!

stuffed chicken  frying pan

While the chicken is being cooked (another little trick: cook it until the juices run clear!), you can go back to our side dish, the Tzatziki:

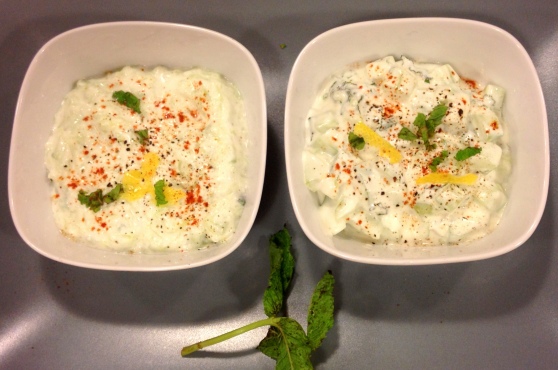
Take the cucumber (it will be dry and crunchy right now!) and in a bowl, combine the yoghurts (2 will be fine) the cucumber, a bit of lemon juice, finely chopped mint leaves, and grated garlic (you could also rub the garlic on the bowl, if you don’t want to add too much garlic flavour!). You’ll find that if you put the chopped cucumber and rubbed garlic on one bowl, and the grated cucumber and chopped garlic in another, it makes a whole different effect on your mouth! Go figure!

Finally, add olive oil, black pepper, and a touch of paprika, and you’re done!

tzatziki

You’re all set to enjoy this dish! Together they make a rocking combination, the warm chicken and the freshness of the Tzatziki!

Little trick #3: To wash off the garlic smell of your hands, wash them with water and rub your hands with something made of steel: quite amazing but it actually works and I will be always grateful for this tip! 🙂 thanks Montse!)

I wanted to thank Tweed and Sol for this class, I had a wonderful time!

Time to have dinner now! 😀 Take care!